Solution:
This error occurs when Receipt currency is different from Invoice Currency. You have to specify p_trans_to_receipt_rate parameter while calling AR_RECEIPT_API_PUB.CREATE AND APPLY.
sample:
DECLARE
--local Variables
g_loc NUMBER :=0;
g_msg VARCHAR2(500);
l_error_description VARCHAR2 (2000) := NULL;
g_sysdate DATE := SYSDATE;
l_ar_receipt_succ_count NUMBER:= 0;
l_ar_receipt_err_count NUMBER:= 0;
l_ar_receipt_tot_count NUMBER:= 0;
l_msg_index_num NUMBER:= 1;
l_msg_count NUMBER;
l_data_txt VARCHAR2(1000);
l_msg_data VARCHAR2(1000);
l_apl_return_status VARCHAR2 (1);
l_apl_msg_count NUMBER;
l_apl_msg_data VARCHAR2 (240);
l_org_id NUMBER := FND_PROFILE.VALUE('ORG_ID') ;
l_gl_date_count NUMBER;
l_functional_currency fnd_currencies.currency_code%TYPE;
l_conv_type gl_daily_conversion_types.conversion_type%TYPE;
l_conv_rate gl_daily_rates.conversion_rate%TYPE;
l_cust_account_id hz_cust_accounts.cust_account_id%TYPE;
l_receipt_id ar_cash_receipts_all.cash_receipt_id%TYPE;
l_return_status VARCHAR2(10);
l_cust_bank_acct_id NUMBER;
BEGIN
l_msg_count := 0;
l_data_txt := NULL;
l_msg_index_num := NULL;
l_gl_date_count := 0;
l_functional_currency := NULL;
l_conv_type := NULL;
l_conv_rate := NULL;
l_receipt_id := NULL;
l_return_status := NULL;
l_msg_data := NULL;
FND_GLOBAL.APPS_INITIALIZE(0, 50259, 222);
MO_GLOBAL.SET_POLICY_CONTEXT('S',l_org_id);
dbms_output.put_line('before calling api ');
-- Call Api to create receipt
AR_RECEIPT_API_PUB.create_and_apply
( p_api_version => 1.0,
p_init_msg_list => FND_API.G_TRUE,
p_commit => FND_API.G_TRUE,
p_validation_level => FND_API.G_VALID_LEVEL_FULL,
p_currency_code => 'USD',
x_return_status => l_return_status,
x_msg_count => l_msg_count,
x_msg_data => l_msg_data,
p_amount => 100,
p_receipt_number => '123767589',
p_receipt_date => sysdate-2,
p_gl_date => sysdate-2,
p_customer_number => 9399,
p_receipt_method_id => 21011,
p_trx_number => 'P18_00004',
p_cr_id => l_receipt_id ,
p_org_id => 93,
p_location => 'RUSK8' ,
p_show_closed_invoices => 'Y' ,
p_exchange_rate_type => 1000,
p_exchange_rate => null,
p_exchange_rate_date => to_date('01/04/2016','dd/mm/yyyy'),
p_amount_applied => 100,
p_trans_to_receipt_rate=>0.5
);
dbms_output.put_line('called api ');
IF (l_return_status = 'S') THEN
dbms_output.put_line('Calling Api AR_RECEIPT_API_PUB.CREATE_CASH success -- >' ||l_return_status ||' Receipt Id > '||l_receipt_id);
ELSE
dbms_output.put_line('Error in Calling Receipt API:');
FOR i IN 1 .. l_msg_count
LOOP
FND_MSG_PUB.GET(p_msg_index => i, p_encoded => 'F', p_data => l_data_txt, p_msg_index_out => l_msg_index_num );
l_error_description := SUBSTR(l_error_description||l_data_txt,1,400);
DBMS_OUTPUT.put_line( l_error_description);
END LOOP;
END IF;
COMMIT;
EXCEPTION
WHEN OTHERS THEN
dbms_output.put_line('Error in procedure '||SQLERRM);
END ;
/
Monday, August 1, 2016
Wednesday, July 27, 2016
How to change column/attribute type on WEBADI
It is not possible to change column/attribute type from
application. All you need to do update below tables from backend.
In bne_interface_cols_b
update data_type column.
1-number, 2-varchar2 and 3-date
In bne_attributes
update attribute2 column to NUMBER, VARCHAR2 or DATE
Monday, June 27, 2016
Error: ORA-1403: No data found in Cash Management
You can encounter this type of error while trying to reconcile receipt or payment to bank statement under Cash Management responsibility.

When you click on ‘Details’, you can see the Error name:

When you encounter this error, close this window> go back to bank statement lines and Save your parameters.

Now try to do reconciliation again. See the reconciled bank statement line with Receipt.

Tuesday, May 31, 2016
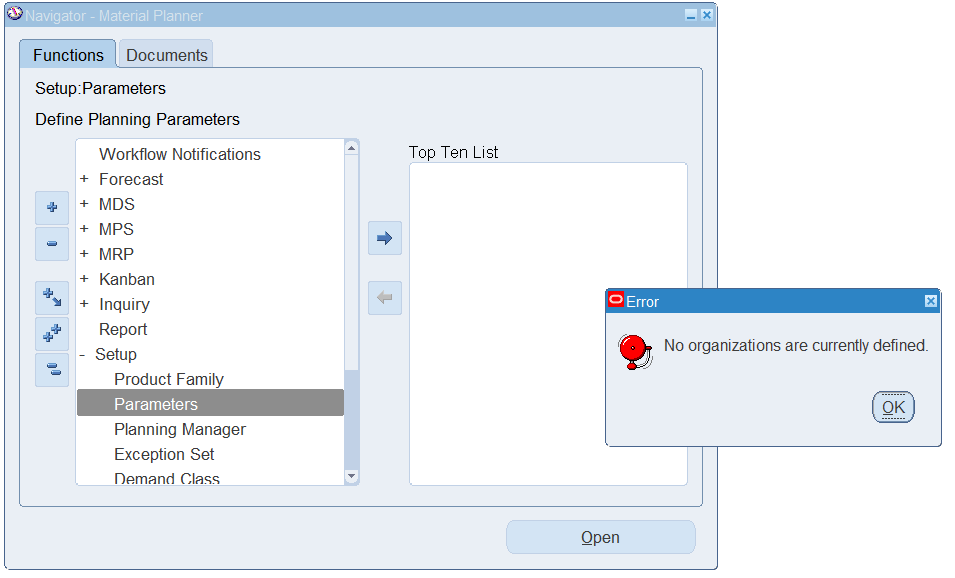
ERROR: 'No Organizations are currently defined'
When the organization is not assigned to responsibility then the following error appears:
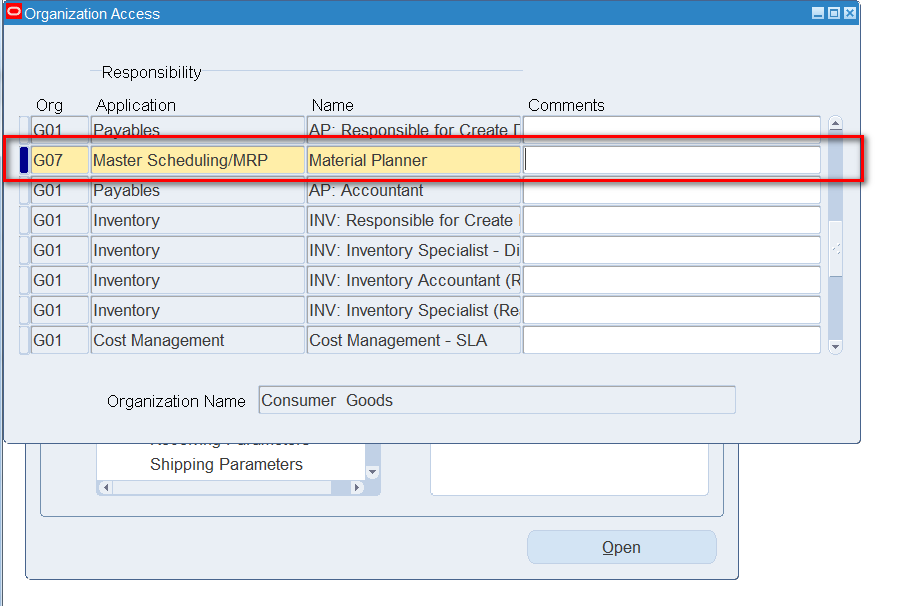
Organization needed as per your business requirements.
Go to Inventory> Setup> Organizations>Organization Access> Add new records in this list for> Save:
Wednesday, May 25, 2016
Runtime Error 91 When trying to create WebADI document
A Runtime error 91 – (Object variable or with block variable not set ) is thrown when trying to create WebADI document.
Solution 1
In Excel 2010, under Developer, go to Code tab and click on Macro Security icon. Check Trust access to VBA project object model under Developer Macro Settings.
Steps
Steps
1. Click the Office Button (top-left button in the window)
2. Click the Microsoft Excel Options button.
3. Click Trust Center in the menu on the left.
4. Click Trust Center Settings in the window on the right.
5. In the new window that opens click Macros in the menu on the left.
6. Under 'Macro Settings' check 'Disable all macros with notification'.
7. Under 'Developer Macro Settings' check 'Trust Access to the VBA project object model'.
8. Click 'OK'
9. Click 'OK'

Solution 2
To turn off Protected View on the desktop and to prevent this message appearing uncheck the following
Excel option:
Options-> Trust Center -> Trust Center Settings -> Protected View -> Enable Protected View for files
located in potentially unsafe locations

Payables transfer to GL
After invoice and payment has been created and validated successfully it has to be transferred to General Ledger.
First of all, the invoice and payment has to be accounted which is done by running Create Accounting. Create Accounting can be run in 3 different modes:
- Draft
- Final
- Final Mode
Draft - The accounting is only created in Subledger tables and is not transferred to the General Ledger. Draft accounting can be recreated or altered.
Final - The accounting is created in Subledger tables and is not transferred to the General Ledger. Accounting created in final mode cannot be recreated or altered. Note that, the accounting entries in ‘Final” mode does not mean that it has finally been transferred to GL. In order to transfer all the entries from subledger table to GL ‘Transfer Journal Entries to GL program’ must be run.
Final Post - The accounting is created in Subledger tables and is also transferred and posted to the General Ledger tables. When you run create accounting in Final Mode but have not transferred them over to GL, and you run the Create Accounting program with Transfer to GL option, then the application does not pick up events that are already created in the final mode.

After you run create accounting for the particular Invoice, you will see the ‘Accounted’ box as YES:

In order to transfer the accounting entries to General Ledger, you need to run ‘Transfer Journal Entries to GL’ request and set the following parameters. The Transfer Journal Entries to GL program needs to be ran separately to transfer any accounting created online or created by a previous Create Accounting process that did not transfer the entries. (Final and Draft mode)
Note*: If accounting is created in error by any mode, the accounting is treated like draft accounting. It can be viewed, but it cannot be transferred. Any changes will need to be made to the transaction or journal line definition/rules to correct the accounting. Once the changes are made you can recreate the accounting in draft again, or final if the accounting is correct.
Based on the above statement, the following are possible causes of journal entries not transferred in R12:
- The accounting is created in Draft mode and cannot be transferred.
- The accounting is created in error and cannot be transferred.
- The accounting was created by Online Accounting with Final Mode.
- The accounting was created by the Create Accounting process with Transfer to General Ledger = No
- The Journal Import failed/had errors. If the Journal Import spawned by the Transfer Journal Entries to GL program fails/has errors, ALL data included in the transfer and import is rolled back/not transferred.
Submit the Transfer Journal Entries to GL process to transfer any accounting that is created in Final mode, but not transferred.
Navigate: Payables Responsibility > Other > Requests > Run > Select and Submit the Transfer Journal Entries to GL program with parameters to include the journal entries to be transferred.

Now search for your invoice> Go to Reports> View Accounting to see the accounting transactions:

Press to ‘View Journal Entry’ to see the accounting entries of the Invoice we created:

See the category, Journal Entry type, description of the Journal entry type. If you want to have more information, click on ‘Show additional Information’:

See the status of transfer to GL: YES

Now see the Journal created in General Ledger:

You can check the invoice number to see whether it has been transfered to GL or not:
select Transaction_number invoice_number, AH.GL_TRANSFER_STATUS_CODE, ah.*
from xla_transaction_entities te
,xla_ae_headers ah
where te.Transaction_number = :Transaction_number --Invoice_number or Check_number
and te.APPLICATION_ID IN (200,222)
AND ah.ENTITY_ID = te.ENTITY_ID
and AH.GL_TRANSFER_STATUS_CODE <> 'Y'
Monday, May 9, 2016
Invoice cancellation
If the invoice has been paid already, they can not be deleted directly from the Invoice Workbench. The paid Invoice which is validated and matched to PO already can be cancelled through Action button which is done inside of Invoice. But before Invoice cancellation the following steps should be followed, as there is related payment and bank account reconciliation to this payment.
Steps for Invoice cancellation:
-
Find Invoice
-
Review Invoice
-
Check the period
-
Check if prepayment exists
-
Check if the invoice is paid
-
Unreconcile the payment if you are using CM
-
Void the payment
-
Unapply the prepayment
-
Cancel the Invoice
In order to start cancellation process, ‘Allow Adjustments to Paid Invoices’ should be enabled from Payables Options:

Step 1: Find Invoice using Payables Manager or AP Accountant responsibility:
 Search the Invoice you want to cancel by clicking search button from the main Menu. Type the Invoice number:

Step 2 and 3: See the paid amount of the Invoice from ‘Amount Paid’ box. It is necessary to check the GL date for the Invoice, as it should be open period to be cancelled, otherwise the system will not allow you to process.

Step 4: It is necessary to check if Prepayment exists for this Invoice and if it has been applied. Copy the prepayment number from ‘View Prepayment Applications’ tab box.

Search for Prepayment by typing the Prepayment number to Invoice search box.

See the Prepayment status which is ‘Fully applied’.
Note*: When the prepayment is applied to an Invoice, Payables automatically creates payment for the Invoice and prepayment and changes the status of Invoice to Paid which reflects the invoice as being paid by the prepayment.

Step 5: Check the payment number from ‘View Payments’ tab box.
Note: This payment number is for the Invoice as well, as when the prepayment is fully applied the invoice is being considered to be paid automatically.

You have access to see payment order related to the Invoice and Prepayment from inside the Invoice (or Prepayment) by clicking on ‘Payment Overview’ box or you can copy the payment number and search it from the Payments itself.
Note* : When you click on ‘Payment Overview’ box, you can directly see all details of payment as well as the status of Payment order which is ‘Cleared’ in our case.


Find the Payment which you need to void:

To void the payment you need to click on Actions button and void it. But when the status of Payment Order is in ‘Cleared’ status which means first it has to be unreconciled from CM module for ‘Void’ button to be active.


Step 6: In order to unreconcile the payment order, you need to switch off to CM Accountant responsibility and find bank statement where this payment was reconciled.
Note*: The bank name which this payment has been paid to is reflected in payment order. You need to check the bank name where it has been paid and search according to this bank.

Search according to bank account number or GL date:

When you find the payment that you want to unreconcile, it is necessary to click on’ Reconciled’ button and finish the unreconciliation process.
 Tick the box on the left and choose the Payment which needs to be unreconciled:

Step 7: The unreconcilation process has been finished. Now switch off to AP Accountant responsibility and find the payment from Payments window to void it.
Click on Actions button and void the payment.
Step 8: Now go inside the Invoice and unapply the Prepayment by clicking on Actions button.


Step 9: Now you are ready to cancel the Invoice after you have unapplied prepayment, unreconciled and voided the payment related to this Invoice.

Note*: When Invoice is cancelled, the amount of Invoice is set to zero. It means the Invoice will be there, but it will not be reflected in any accounting analysis as the account will be zero.
The Invoice will exist but the status will show as ‘Cancelled’.

Find Invoice
Review Invoice
Check the period
Check if prepayment exists
Check if the invoice is paid
Unreconcile the payment if you are using CM
Void the payment
Unapply the prepayment
Cancel the Invoice